Additional sizes may be available!
Additional sizes may be available! Email me when availableOverview
| * | Internal UV sterilizer with water pump simplifies aquarium installation |
| * | Effectively clears green water in freshwater or saltwater aquariums |
| * | Self-contained UV sterilizer requires no plumbing or tools for assembly |
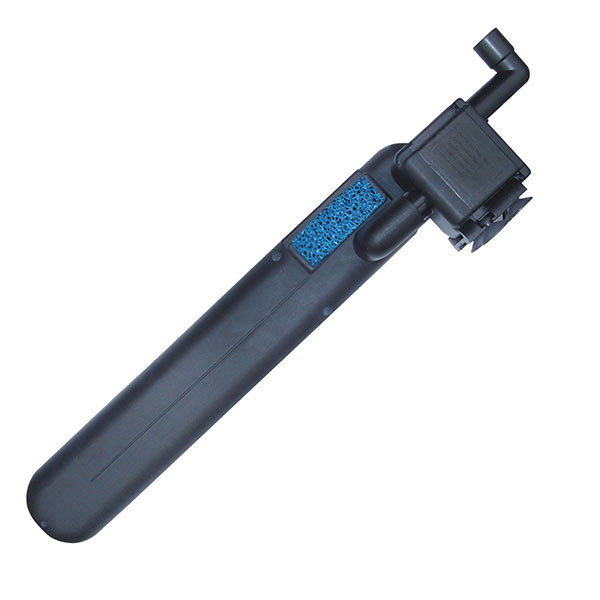
Enjoy cleaner, clearer aquarium water without complicated UV plumbing. AA Aquarium Green Killing Machine Internal UV Sterilizer with Powerhead streamlines installation by including a properly sized water pump and a patented Sealed Water UV Bulb. The result is super quick 5-minute UV installation without tools, hardware or external pipes or plumbing!
AA Aquarium Green Killing Machine Internal UV Sterilizer with Powerhead is a revolutionary internal UV sterilizer that controls unsightly green water and eliminates cloudiness in freshwater or saltwater aquariums. Self-contained UV sterilizer features a patented Sealed Water UV Bulb that allows water to flow in direct contact with the UV lamp to boost efficacy. LED warning light monitors UV lamp performance and provides a visual alert when UV lamp needs replacement. UL Listed. For freshwater or saltwater aquarium use.
| Specifications | ||
| Green Killing Machine | Recommended For | Dimensions |
| 9W UV | Aquariums up to 50 gallons | 4" x 4" x 12" long |
| 24W UV | Aquariums up to 120 gallons | 5" x 5"x 16" long |
Installation Instructions:
- Carefully remove the unit from the packaging materials. Check for damage.
- Identify components
- (1) Sealed Sterilizing Lamp Assembly - Oval shaped
- (1) Power Adaptor - Plugs into wall outlet
- (1) Connection Box with 3 Connection Plugs
- (1) Filter Pump
- (2) Plastic Elbow Fittings (1 thin and 1 fat)
- (1) Blue Filtration Pump
- 24-Watt version ONLY - (1) Suction Cup Plate and (1) Large Ring Suction Cup
- Look at the picture on the box of UV Assembly for reference. Holding the Lamp Assembly upright, attach the Fat Elbow Fitting to the round outlet on the bulb so it faces up. Now connect the Thin Elbow Fitting to the Filter Pump Outlet.
- For 24-Watt version ONLY - Add Suction Cup Plate onto Pump and Ring Suction Cup onto Bulb Housing.
- Submerse the UV Assembly in your tank for 30 seconds to allow air bubbles to escape. Extra bubbles provide unwanted buoyancy.
- Locate the UV in the desired location in your aquarium making sure the Bulb Assembly is covered with water. The UV bulb may be rotated if needed to fit your tank.
- To avoid the risk of shorting caused by water vapor, the Connection Box MUST be affixed onto the outside of the tank but not on the top of the tank.
- Electrical Connections:
- Lamp Assembly to Connection Box (2 pin plug)
- Filter Pump to Connection Box (male to female connection)
- Pump Adapter to Connection Box (female to male connection)
- To operate, plug in the Power Adaptor
- Lighted LED on Connection Box confirms sterilizer operation.
Operating Hint: For UV Sterilizers to be effective, water contact time inside the Bulb Assembly must be maximized. For this reason, the water flow to the Bulb Assembly is restricted and may seem slow but that is intended for efficacy.
9W UV Kit (Mfg# AAUV9W) with 50 gph pump has a Bulb Assembly flow through rate of 37 gph.
24W UV Kit (Mfg# AAUV24W) with 120 gph pump has a Bulb Assembly flow through rate of70 gph.
UV Bulb lasts for 6 to 9 months. To maximize UV bulb life, use the Green Killing Machine when you have green water problem, switch OFF when water becomes clean; or turn it on for 8 hours a day only.
Maintenance
For best performance, service every 3 to 5 weeks depending on your water conditions. Always keep the blue inlet filtration sponge clean. IMPORTANT! Always unplug the power adaptor before carrying out any maintenance. To Clean Filter Pump and Filtration Pump- Remove Lamp Assembly from your aquarium.
- Remove and rinse Filtration Sponge under tap water.
- Remove Filter Pump from plastic Elbow Fitting.
- Take out the Impeller and rinse under tap water.
- Remove any foreign material from impeller cavity.
- To reassemble, reverse above steps.
Impeller Removal Tips:
- For 24W version, remove the Suction Cup Plate first.
- Connect the plastic Elbow to the Impeller Housing.
- Use the plastic Elbow as a tool and pry off Pump Cover.
- Remove Pump Cover and Elbow and then remove Impeller.


