

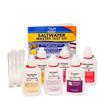

Overview
| * | Easy and accurate saltwater test solutions for pH, ammonia, nitrite, and nitrate |
| * | Lets you monitor and maintain your saltwater aquarium |
| * | Test critical water parameters at an economical price |
The Saltwater Master Liquid Test Kit contains all you need to monitor the water in your marine aquarium to ensure the good health of your fish. These essential tests help you adjust your water parameters for the success of your marine fish. Long-lasting kits contain tests for pH (180 tests), ammonia (90 tests), nitrite (150 tests), and nitrate (75 tests). The enclosed instruction booklet explains how to use test kit in an easy-to-understand manner for precise test results. Refills available for Ammonia, Nitrite & Nitrate and pH.
Also available as a Reef Master Liquid Test Kit for reef aquarists.
| pH Testing Instructions |
| Ammonia Testing Instructions |
| Nitrite Testing Instructions |
| Nitrate Testing Instructions |
Saltwater pH Test Instructions
Why Test pH?
pH is the measure of acidity of water. A pH reading of 7.0 is neutral. A pH higher than 7.0 is alkaline, and a pH lower than 7.0 is acidic. Marine fish and invertebrates require a pH between 8.2 and 8.4. Maintaining the aquarium at the proper pH ensures optimal water quality.
Testing Tips
This test kit measures pH from 7.2 to 8.8 in either fresh or saltwater aquariums. This kit contains two High Range pH Test Color Charts – one for freshwater aquariums, and one for saltwater aquariums – so be sure to use the correct chart for your type of aquarium when interpreting test results. Artificial salt water should have a pH of 8.2.
Directions for Testing High Range pH
Read thoroughly before testing. Do not allow Test Solutions to get into aquarium.
To remove childproof safety cap: With one hand, push red tab left with thumb while unscrewing cap with free hand.
- Fill a clean test tube with 5 ml of water to be tested (to the line on the tube).
- Add five drops of Indicator Solution, holding dropper bottle upside down in a completely vertical position to ensure uniformity of drops.
- Cap the test tube and invert tube several times to mix solution. Do not hold finger over open end of tube, as this may affect the test results.
- Determine the pH reading by matching the color of the solution against those on the High Range pH Color Chart. The tube should be viewed against the white area beside the color chart. Color comparisons are best made in a well-lit area. The closest match indicates the pH of the water sample. Rinse the test tube with clean water after each use.
Recommended pH Levels
A pH level of 8.2 is ideal for saltwater fish and invertebrates.
[Back to top]
Ammonia Test Insruuctions Why test for Ammonia? Directions for Testing Ammonia Levels
What the Test Results Mean The ammonia level is not an indication of the nitrite level; nitrite is another toxic waste material, which must be tested separately. Monitoring Ammonia Levels Detoxifying Ammonia Using Ammo-Lock Nitrite Test Instructions Why Test For Nitrite?
What The Test Results Mean Monitoring Nitrite Levels Nitrate Test Instructions Why Test For Nitrate? Directions for Testing Nitrate
What The Test Results Mean Monitoring Nitrate Levels Reducing Nitrate in the Aquarium
Fish continually release ammonia (NH3) directly into the water through their gills, urine, and solid waste. Uneaten food and other decaying organic matter also add ammonia to the water. A natural mechanism exists that controls ammonia – the biological filter. It is made up of nitrifying bacteria, which live in the substrate and biological filter media. However, as with any natural process, imbalances can occur. Testing for the presence of toxic ammonia is essential, so that once detected, steps can be taken to remove it. Otherwise, ammonia will damage gill membranes, and prevent fish from carrying on normal respiration. High levels of ammonia quickly lead to fish death. Even trace amounts stress fish, suppressing their immune system and thereby increasing the likelihood of disease outbreaks and subsequent fish loss.
In new aquariums, the ammonia level may surge to 6 ppm (mg/L) or more, and then fall rapidly as the biological filter becomes established. The ammonia will be converted to nitrite (also toxic), then to nitrate. This process may take several weeks. Use Aquarium Pharmaceuticals Stress Zyme to speed up the development of the biological filter. In an established aquarium or pond, the ammonia level should always remain at 0 ppm (mg/L). The presence of ammonia indicates possible overfeeding, too many fish, or inadequate biological filtration.
Regular testing is necessary to make sure the ammonia level is safe. Aquarium and pond water should be tested for ammonia every other day when it is first set up, and once a week after the biological filter has been established (in about 4 to 6 weeks).
To detoxify ammonia, use Aquarium Pharmaceuticals Ammo-Lock to instantly lock up ammonia. Ammo-Lock does not remove ammonia; it simply converts toxic ammonia to a nontoxic form. Ammonia test kits will still test positive for ammonia, even though it is nontoxic. The biological filter will then consume the nontoxic ammonia, converting it to nitrite and then to nitrate.
[Back to top]
Testing for the presence of toxic nitrite is essential, so that once detected, steps can be taken to remove it. Otherwise, nitrite in the water will prevent fish from carrying on normal respiration. High levels of nitrite quickly lead to fish death. Even trace amounts of nitrite stress fish, suppressing their immune system and, thereby, increase the likelihood of disease and subsequent fish loss.
In new saltwater aquariums, the nitrite level will gradually climb to 10 ppm (mg/L) or more. As the biological filter becomes established (in 4 to 6 weeks), nitrite levels will drop to 0 ppm (mg/L). In an established pond or aquarium, the nitrite level should always remain at 0 ppm (mg/L). The presence of nitrite indicates possible overfeeding, too many fish, or inadequate biological filtration.
Regular testing for nitrite is an essential part of routine maintenance. Water should be tested for nitrite once a week to make sure the nitrite does not reach undesirable level.
[Back to top]
Nitrate (NO3-) is produced in the aquarium by the biological filter. Beneficial bacteria in the biological filter convert toxic ammonia and nitrite into nitrate. A high nitrate level indicates a buildup of fish waste and organic compounds, resulting in poor water quality and contributing to the likelihood of fish disease. Excessive nitrate also provides a nitrogen source that can stimulate algal blooms. In the opinion of many aquarists, maintaining a low nitrate level improves the health of fish and invertebrates.
Read thoroughly before testing. Do not allow Test Solutions to get into aquarium.
To remove childproof safety cap: With one hand, push red tab left with thumb while unscrewing cap with free hand.
In new saltwater aquariums, the nitrate level will gradually climb as the biological filter becomes established. It is important to keep nitrate levels as low as possible, especially in reef aquariums with invertebrates.
Regular testing for nitrate is an essential part of routine aquarium maintenance. Aquarium water should be tested for nitrate once a week to make sure the nitrate does not reach an undesirable level.
Partial water changes help reduce the nitrate level, especially if the initial nitrate level is very high. However, because many tap water supplies contain nitrate, it can be difficult to lower nitrate levels by this method. Aquarium Pharmaceuticals Tap Water Purifier will remove all pollutants, including nitrate, from tap water, making water changes effective. The Tap Water Purifier makes any tap water perfect aquarium water.
Supplies You May Be Interested In

More Aquatic Life


Customer Testimonials
No testimonials have been submitted for this product.
Would you like to submit a testimonial? Click here
LiveAquaria Education Center
|
Join our social networks

See details >
Copyright © 2024, LiveAquaria®. All rights reserved. 2389 Air Park Road, Rhinelander, Wisconsin 54501
Features
Resources
Services
Join our social networks
*FREE SHIPPING on qualifying aquatic life orders $229 and up. FREE SHIPPING on qualifying aquarium supplies orders $49 and up. Excludes Frozen Foods. See details >
Copyright © 2024, LiveAquaria®. All rights reserved.
2389 Air Park Road, Rhinelander, Wisconsin 54501 |
